What is casting on
Casting on is creating the first row of stitches on a needle — the starting point of every knitting project. Without casting on, you cannot start knitting. There are many cast-on methods and each has different properties — some create a stretchy edge, others firm, some are simple and others decorative.
Method 1: Backward Loop Cast On (e-wrap)
The simplest method — ideal for complete beginners.
Process: Make a loop on the needle (slip knot). Then repeatedly wrap yarn around your thumb and thread loops onto the needle. Each loop = one stitch.
Advantages: Extremely simple, anyone can master it.
Disadvantages: Edge is very loose and unstable. Stitches can stretch. Only suitable for temporary cast-on or small number of stitches (adding stitches mid-row).
Method 2: Knitted Cast On
You create stitches by knitting into the previous stitch.
Process: Make the first stitch (slip knot). Insert right needle into this stitch as for knit stitch, wrap yarn, pull through new stitch — but instead of sliding off the old stitch, leave it on the left needle and place the new stitch ALSO on the left needle. Repeat — each new stitch is created from the previous one.
Advantages: Firmer edge, easy to learn, easy to count.
Disadvantages: Less stretchy — not suitable for hems that need to stretch (hats, socks).
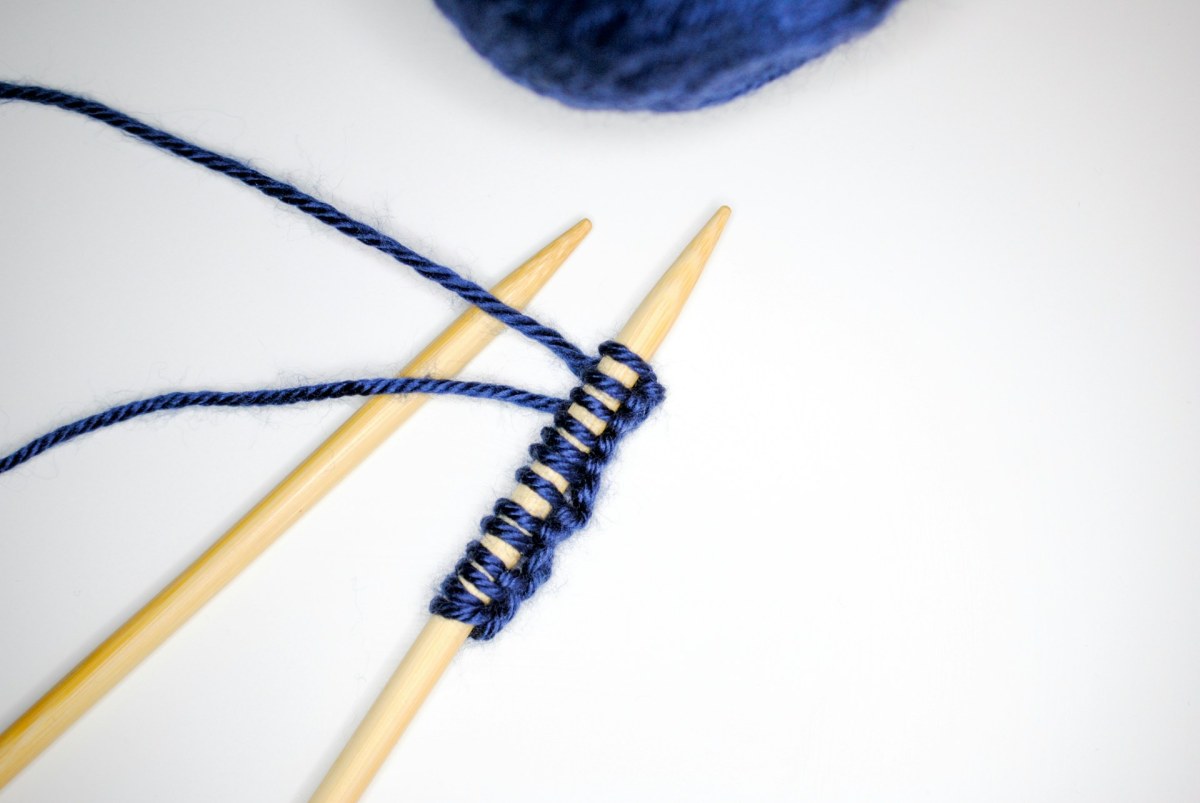
Method 3: Long-Tail Cast On
The most versatile and most commonly used method.
Process: Measure the tail end of yarn — approximately 3× the width of finished work. Make a slip knot and place on needle. Spread thumb and index finger of left hand into "V" with yarn — tail over thumb, working yarn over index finger. With needle, pick up yarn from thumb from bottom up, then from index finger from top down, and pull through loop on thumb. Tighten — one stitch.
Advantages: Even, stretchy edge. Looks professional. Suitable for most projects.
Disadvantages: You must estimate tail length. If it's too short, you must start over. Solution: cast on a few more stitches than needed and slide off excess stitches at the end.
How to Choose the Right Method
| Project | Recommended Method | Reason |
|---|---|---|
| Scarves, blankets | Long-tail | Stretchy, even edge |
| Hats, socks | Long-tail or tubular | Need for stretch |
| Sweater hems | Long-tail | Stable but stretchy |
| Adding stitches mid-row | Backward loop or knitted | Quick, no preparation |
| Temporary cast-on | Provisional cast on | Can be unraveled later |
How Much Yarn for Tail (Long-Tail)
General rule: for each stitch you need approximately 2.5 cm (1 inch) of free yarn plus reserve. For 100 stitches: 100 × 2.5 cm = 250 cm + 30 cm reserve = 280 cm tail. Or more simply — wrap yarn around needle as many times as you need stitches, and add 30 cm.
Common Mistakes
Too tight stitches — cast-on is tighter than actual knitting. If edge is pulled and inelastic, cast on with needles 1–2 sizes larger then switch to correct size.
Short tail with long-tail — frustrating mistake that forces you to rip out and start over. Always give more rather than less.
Uneven tension — first stitches are looser, last ones tighter (or vice versa). Try to maintain the same pull throughout the entire cast-on.