We received a question that almost everyone who has tackled their first sweater or sleeve knows well:
"I'm just starting out with a knitting machine and somehow I can't get my head around how decreases are calculated when I want to, say, taper a sleeve or shape an armhole. Is there some kind of formula for this, or does everyone just eyeball it?"
There is a formula — you don't have to eyeball it. It's called the magic formula, and once you understand it, decreasing will never be a mystery again. In the first part of this article we'll explain it using concrete numbers. In the second part we'll show how the whole calculation — including the armhole, the neckline and the shoulders — can be done for you by our KnitGrid calculator, so instead of doing the math you simply draw the shape of the piece.
What "decreasing stitches" means and why it has to be calculated
Knitted fabric grows in a regular grid: every stitch has its width and every row its height. When you want a piece to be narrower at the top than at the bottom — a sleeve toward the wrist, an armhole on the body, or the toe of a sock — you have to gradually reduce the number of stitches. This is called decreasing (the opposite is increasing, where you widen the piece).
The problem isn't how to decrease a single stitch — that's a mechanical matter. The problem is how many stitches to decrease and, above all, how to spread them out over the height so that the edge comes out evenly and ends up exactly where it should. If you bunched all the decreases together, you'd get a sharp step; if you spread them out wrong, the sleeve either won't finish tapering in time, or it'll be done while you still have ten "extra" rows ahead of you.
The bridge between centimetres (your measurements) and stitches (the counts on the machine) is your knitting gauge. Without it, decreases can't be calculated — which is why you should always knit a swatch first. If you're not sure how to do that, read our guide to measuring knitting gauge.
The magic formula: how to spread decreases evenly
The whole trick rests on a single division with a remainder. You only need to know two numbers: how many stitches to decrease on one side and over how many rows you have to do it.
Number of rows ÷ number of decreases = how often to decrease. The remainder from the division tells you how many decreases to space one row further apart, so that the shaping ends exactly on the last row.
Let's take an example. You have 96 stitches on the machine and you need to get down to 72 stitches on both sides of the armhole. So you have to decrease 24 stitches in total, which is 12 stitches on each side. The armhole is tall enough that, according to your swatch, it works out to 40 rows.
Let's calculate: 40 ÷ 12 = 3, remainder 4. So the basic rhythm is "decrease every 3rd row." But because the division didn't come out evenly, 4 of those twelve decreases have to be done one row later — every 4th row — so that the 12 decreases stretch exactly across the 40 rows. The result:
- 8× decrease 1 stitch at both ends every 3rd row
- then 4× decrease 1 stitch at both ends every 4th row
Check: 8 × 3 + 4 × 4 = 24 + 16 = 40 rows and 8 + 4 = 12 decreases on each side. It adds up exactly. Here are a few more combinations so you can see how the formula behaves:
| Decreases on each side | Number of rows | Distribution per the formula |
|---|---|---|
| 10 | 50 | every 5th row 10× (comes out with no remainder) |
| 12 | 40 | every 3rd row 8×, then every 4th row 4× |
| 20 | 150 | every 7th row 10×, then every 8th row 10× |
That's the whole secret of the "magic" formula — no magic at all, just division with a remainder. The same principle applies to increasing and to hand knitting; it's not something specific to the machine.
Where manual calculation most often goes wrong
The formula is simple, but on a real piece you usually won't use it once — you'll use it five times. And that's exactly where the catch is:
- Rounding. Converting from centimetres to stitches and rows goes through the knitting gauge, and the results almost never come out as whole numbers. You have to keep an eye on every rounding up or down, otherwise the piece "drifts" by a stitch or two.
- There are several zones. On a sweater body you decrease at the waist, then increase toward the chest, then decrease at the armhole, shape the neckline at the top and bind off the shoulders. That's five separate calculations that have to link up with one another.
- Both sides and the carriage. On a machine you can't increase the same amount at both ends in a single row — you can only increase on the carriage side, the other edge not until the next row. Decreasing can be done on both sides at any time. It's easy to make a mistake here.
- Change the size — and you recalculate. All it takes is wanting the piece two centimetres longer or wider, and the whole calculation starts over from scratch.
This is exactly why we built KnitGrid: so that the calculation — including the rounding, both sides and the carriage position — happens automatically and instantly after every change.
KnitGrid: draw the shape, the plan calculates itself
KnitGrid is a free online pattern calculator for machine knitting. It works the opposite way to manual calculation: you enter what the piece should look like in centimetres, and the tool works out what you need to do on the machine in stitches and rows.
So instead of paper, a pencil and a calculator, you simply draw the silhouette of the piece into a grid (or pick a ready-made template), enter your swatch, and at the bottom a finished knitting plan appears — row by row: when to cast on, where and how often to decrease or increase, how to shape the neckline and bind off the shoulders.
How to do it step by step
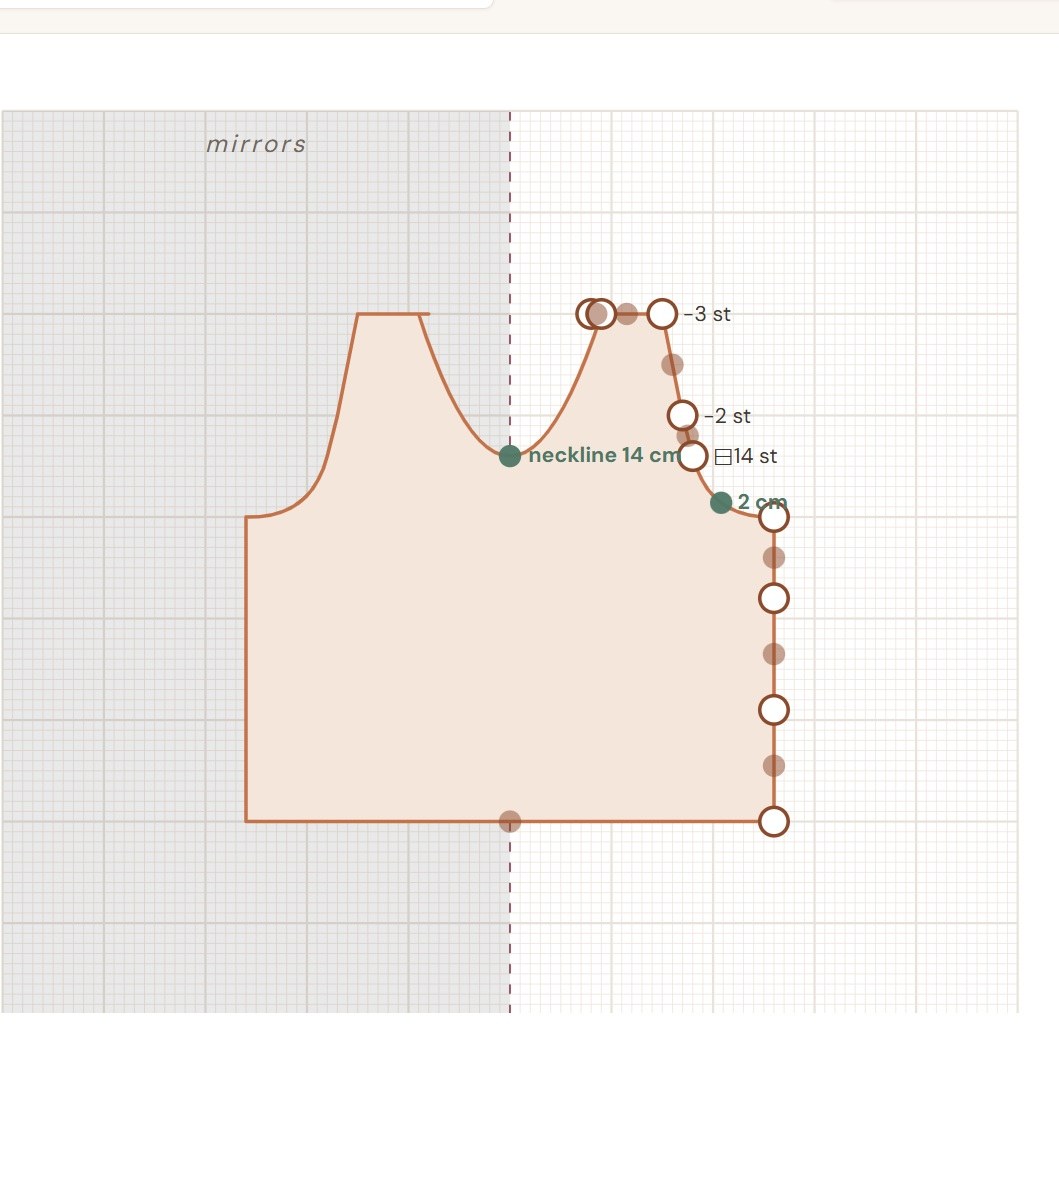
- Draw the piece, or start from a template. In the Panel drawing section, by clicking into the grid you create the points of the piece's right edge from the bottom up; the points connect automatically. You can drag the dots to move them and double-click to delete them (double-clicking a brown arc point straightens the edge again). Don't want to draw from scratch? Pick a ready-made start — Body (T-shirt / sweater), Sleeve, or Trouser leg — and just adjust it. Pull the brown point in the middle of a segment out to the side when you want to curve a straight edge into an arc (such as a rounded armhole).
- Choose the drawing mode. In symmetric mode you draw only the right edge and the left one mirrors it — ideal for ordinary, symmetric pieces. Free mode leaves both edges independent, for when you need an asymmetric shape.
- Enter your 10×10 cm swatch. In the stitches and rows fields, type how many of each you have on a swatch measuring 10×10 cm. This is the most important step — it's your knitting gauge that converts centimetres into specific stitch counts. The more honestly you measure the swatch, the more accurate a plan you'll get.
- Read the knitting plan. A finished set of instructions is calculated continuously at the bottom. In it you'll find how many stitches to cast on, where to knit straight, where to decrease or increase (and how often — exactly according to the magic formula), how to shape the neckline and bind off the shoulders. In the silhouette diagram you'll also see markers: + increase, − decrease and ⊟ bind off all at once (on steep sections).
- Save, export or share. The Export as PDF button prints the plan out for the machine. Save and get a link creates a permanent short link to your design, which you can keep or pass along.
Everything KnitGrid calculates
Under the hood, the tool handles exactly the calculations that are tedious to do by hand:
- Cast-on — the number of stitches on the starting row based on the width at the bottom.
- Even decreasing and increasing — it distributes them with the magic formula so they fit exactly over the height of the section.
- Steep sections — where the shaping is too sharp to decrease one at a time (a shoulder, a deep cut-out), it suggests binding off all at once, or casting on extra stitches along the edges.
- Neckline — central bind-off of stitches and shaping of the neck edge.
- Shoulders — stepped binding off, each shoulder separately.
- Carriage direction — the plan makes sure that increasing can only be done on the carriage side (the other edge in the following row), while decreasing can be done on both sides at any time.
Tips for an accurate result
- Don't skimp on the swatch. The whole plan stands or falls with the knitting gauge. Knit the swatch with the yarn, needles and tension you'll use for the garment, and measure it after washing and drying.
- On big projects, test the plan first. Knit a few centimetres of shaping according to it and measure them. If the dimensions match, you can start the whole piece with peace of mind.
- A shallow neckline = a boat-neck shape. For a nicely rounded front neckline, choose a depth of roughly 5–7 cm. A very shallow neckline comes out fairly straight (boat-neck) — which is, conversely, ideal for the back piece.
- Handle steep edges with binding off, not decreasing. When a section is almost horizontal (typically a shoulder), there's no point decreasing one at a time — KnitGrid will suggest binding off several stitches at once on its own.
- Need to shape without decreasing? For curves that don't change the stitch count (such as a shoulder slope or the heel of a sock), short rows are the way to go.
Give it a try
Calculating decreases isn't about a talent for numbers — it's a single division with a remainder. Once you understand it, you'll be able to work out the shaping of any piece. And when you don't feel like calculating, open KnitGrid, draw the shape, enter your swatch and you'll have the plan in a few seconds — ready to download as a PDF or to share with a link.
If you're only just getting started with a knitting machine, take a look at our overview of knitting machines or at the article on what stitch patterns you can create on a machine. And even if you knit by hand, the magic formula works exactly the same — it's counted in stitches and rows, not in needles.